
Dell SonicWALL Analyzer Reporting Overview
An essential component of network security is monitoring critical network events and activity, such as security threats, inappropriate Web use, and bandwidth levels. Dell SonicWALL Analyzer Reporting complements SonicWALL's Internet security offerings by providing detailed and comprehensive reports of network activity.
The Dell SonicWALL Analyzer Reporting Module creates dynamic, Web-based network reports from the reporting database.
The Analyzer software application generates both real-time and historical reports to offer a complete view of all activity through SonicWALL Internet security appliances. With Analyzer Reporting, you can monitor network access, enhance security, and anticipate future bandwidth needs.
You can create Custom reports by using the report filter bar, available in most report screens in the Analyzer UI. The report Filter Bar provides filters to allow customized reporting, including pre-populated quick settings for some filter fields. A Date Selector allows paging forward and backward in time, or selecting a particular time period for viewing, via a pull-down calendar. The search operator field offers a comprehensive list of search operators that varies depending on the search field, which can be either text-based or numeric. Refer to Layout of Reports Display to see these items in the context of the Report page.
You can search all columns of report data except columns that contain computed values, such as %, Cost, or Browse Time. Dell SonicWALL Analyzer waits until you click the Go button before it begins building the new report.
The Dell SonicWALL Analyzer Reporting Module provides an interactive interface that:
• Displays bandwidth use by IP address and service
• Identifies inappropriate Web use
• Provides detailed reports of attacks
• Collects and aggregates system and network errors
• Shows VPN events and problems
• Tracks Web usage by users and by Web sites visited
• Provides detailed daily firewall logs to analyze specific events.
The Analyzer Reports view under the Firewall, SRA and CDP tabs is divided into three panes, as shown below: the TreeControl Pane, the middle pane with the Policies and Reports tabs, and the Reports pane.
• TreeControl Pane : A list of individual units referred to as the TreeControl . In the left pane, you can select the top level view or a unit to display reports that apply to the selected view or unit The top level view is GlobalView .
• List of Reports : The middle pane provides two tabs: Policies and Reports . The Reports tab contains a list of available reports that changes according to your selection in the TreeControl pane: GlobalView provides a general summary of various functions, and unit view provides specific details. The reports are divided into categories. You can click on the top level report in a category to expand it to view the list of reports in that category, then click on an individual report name to view that report. To keep a category in expanded view, click on the category while pressing the Ctrl key. Otherwise, the expanded entry will collapse when the next entry is expanded.
• The Reports Pane : The right pane displays the report that you selected in the middle pane for the view or unit that you selected in the TreeControl . For most reports, a search bar is provided at the top of the pane. Above the search bar, a time bar is provided. You can view the report for a particular time by clicking right and left arrows, or clicking on the center field to get a pull-down menu with more options. Click on icons in the upper left corner to send the report to a PDF or UDP file. These files can then be printed for reference. A quick link to the Universal Scheduled Reports menu is also provided, allowing you to set up scheduling and other functions.
The SonicWALL Analyzer reporting module provides the following configurable reports under the Firewall and SRA tabs:
Table 1 Firewall Reports
Provides an overall data usage report.
User Activity Reports
Produces a Detail report of user activity.
Provides information on application access and firewall reports
Provides Web usage reports, including initiators and sites.
Provides web filter event reports, including by initiators, by sites, and by category.
Provides VPN usage reports on policies, services, and initiators.
Threats (Summary Only)
Access attempts by appliance.
Provides event reports about intrusion prevention, targets, initiators, as well as detailed timelines.
Provides reporting on virus attacks blocked.
Provides reporting on attempts to install spyware.
Provides event reports about attacks, targets, and initiators,
Provides login reports.
Provides a detailed analysis of logs or activities.
Configures settings for Summarizer and Log Analyzers.
Creates, configures, and displays alerts.
Provides Internet Activity and Website Filtering reports with details from raw data
Custom Reports are only available at the unit level.
* Multi-Unit Report Available
Provides a high-level activity summary for multiple units.
Note : All reports that are displayed in the Firewall > Reports tab are also available in the Universal Scheduled Reports. However, the By Initiator and By Site reports related to Web Activity are available only as Scheduled Reports and are not displayed in the Firewall > Reports tab.
Table 2 SRA Reports
Provides general unit and license status.
Provides an overall data usage report.
User Activity Reports
Produces a Detail report of user activity.
Provides information on application access and firewall reports
Provides login reports.
Provides Web Application Usage (WAF) usage reports.
Provides web filter event reports.
Provides a detailed analysis of logs or activities.
Used to configure and view Alerts.
Provides Internet Activity and Website Filtering reports with details from raw data
Custom Reports are only available at the unit level.
* Multi-Unit Report Available
Provides a high-level activity summary for multiple units.
Table 3 CDP Reports
Provides general unit and license status.
Multi-unit Summary Reports
Provide a high-level summary of disk capacity.
Provides a report on disk capacity for an individual appliance.
Provides a report on backup activity, including top agents and top file extensions backed up.
Navigating Dell SonicWALL Analyzer Reporting
Dell SonicWALL Analyzer Reporting is a robust and powerful tool you can use to view detailed reports for individual SonicWALL appliances.
This section describes each view and what to consider when making changes. It also describes the Search Bar and display options for interactive reports, as well as other enhancements provided in Dell SonicWALL Analyzer. See the following sections:
From the Global view of the Firewall Panel, Summary reports are available for all SonicWALL appliances connected to Dell SonicWALL Analyzer. The Summary provides a high level report for all appliances. More detail is available from the Unit view.
To open the Global view, click the My Reports view icon in the upper-left hand corner of the left pane.
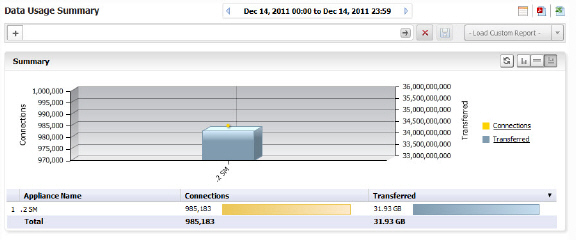
Summary pages are available for the major functions on the middle pane. By default, they display both the Chart View and Grid View. You can use the toggle buttons to the right to display either view, or both.
Note The selected Chart of Grid view remains in effect only for the specified screen. Changing screens will default back to the Chart and Grid View.
The Unit view provides a detailed report for the selected SonicWALL appliance.
Dell SonicWALL Analyzer provides interactive reports that create a clear and visually pleasing display of information. You can control the way the information is displayed by adjusting the settings through toggles that allow you to display a graphical chart, a grid view containing the information in tabular format, or both (default). Reports are scheduled and configured in the Universal Scheduled Reports settings. For more information, refer to Using the Universal Scheduled Reports Application .
The Reports tab provides a list of available Reports. Click on the type of report to expand the list items and view the available reports in that screen group.
Tip At times, you may wish to see multiple screen groups at the same time. Ctrl-click to keep a previously-expanded topic from collapsing when you select a new report category. For example, you may want to view Data Usage, Applications, and Intrusions simultaneously, to see what detail sections are available. Control-click on these entries to see all the screen groups under these entries simultaneously.
The reports available are usually the reports that appear as sections in the Details view. The Details entry is a shortcut to a view of all the available reports.
To access the Reports, use the following steps:
1. Click on the desired tab at the top of the Dell SonicWALL Analyzer interface.
2. To open the Unit view, click on a device in the TreeControl pane.
3. Click on the desired report in the list of reports in the middle pane.
The default view of a root-level report always shows the chart and grid view of the report. The Sections displayed in the Grid View depend on the Report item selected and the filters applied to it. Additional information can be displayed by mousing over certain elements of the Report.

Note As you navigate the Firewall panel with a single SonicWALL appliance selected and apply filter settings, your filter settings will remain in effect throughout the session. To remove filter settings, click on the search bar “Remove Filters” button. (Refer to the graphic in Layout of Reports Display .)
Layout of Reports Display
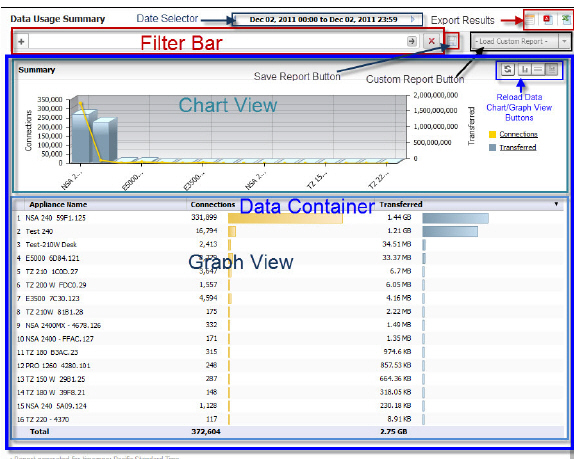
The Report Display is comprised of the following areas:
• The Filter Bar area, which includes the Time Bar, Export buttons and Custom Reports buttons, and data filter functions
• Report Data Container, containing the Chart and/or Grid Views
The figure below shows the layout of the Report.
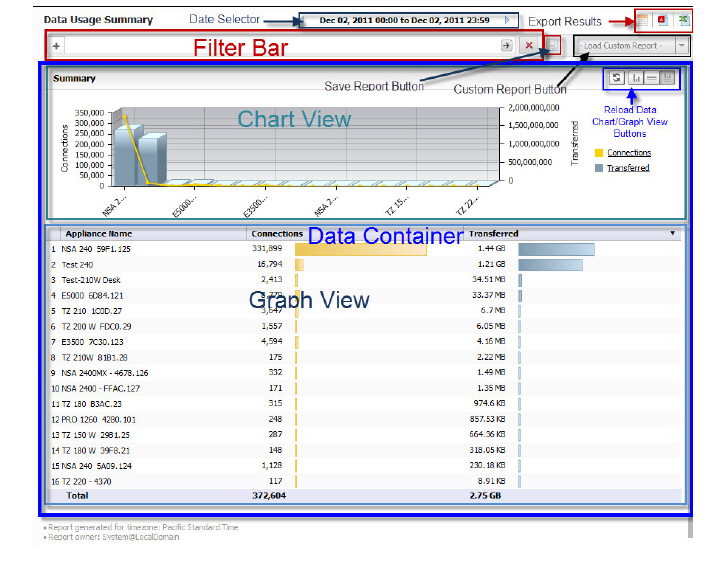
The Report contains the following areas:
• The Date Selector Bar

• Export Options, including:
– Schedule Report Button: brings up the Universal Scheduled Reports menus
– Export to CSV
– Export to PDF
• Load Custom Report button
• Report Data Container . The Report Data Container consists of the Chart View and the Grid View, the Show Chart , Show Grid , and Show Chart and Grid toggle buttons, and the Reload Data button.
Note The Chart view is clickable. You can drill down to Detail sections simply by clicking on areas of interest in the bar-chart or pie-chart.
The Date Selector
The Date Selector allows you to generate a report for only a specific date and time range. Use the right and left quick-link arrows to move backward and forward in time, a day at a time. Clicking the time field on the Date Selector brings up a pull-down menu that allows you to customize your time and date ranges.
Setting a Date or Date Range
By default, summary reports display only information for a single date. However, by using the Time Selector pull-down menu, you can fine-tune the time, date, or range of times and dates you want to see. Over-time reports display information over a date range.
Selecting a Date and Time
The Time Selector allows you to specify any time or date interval desired, whether by day, or in hour/minute intervals. To select a single date for a report, either use the Date Selector bar and the left and right arrows to page through reports by date, or click on the displayed date field in the Time Selector to display the pull-down schedule menu.
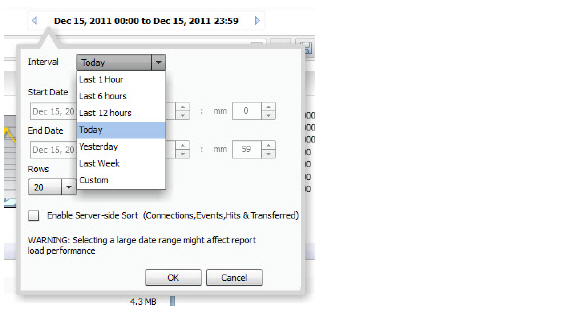
You can select from:
• Today - 00:00 to 23:59
• Yesterday - 00:00 to 23:59
• Last Week - the previous 7 days, from 00:00 to 23:59
• Custom - a custom time and date range
In the pull-down schedule menu, you can specify a recent time snapshot, or click on Custom to select the starting and ending dates and times. The Custom option allows you to select a specific time and date or range from the Interval menu.
1. To set up a custom time range, click in the Time Selector Bar. The Interval pull-down menu appears.
In the Interval menu, you can either set the date manually or by using the pull-down calendar. In the calendar, you can set the month by clicking the desired dates. If no data is available for a specific date, that date will not be available (grayed out).
2. Set a specific start and ending time by specifying hours and minutes you want to monitor. The default for a date is an interval starting at hour 0 minute 0 (midnight) and ending at 23:59 (11:59 PM).
3. The Interval menu also lets you set how many lines of information appears in the graph view. Click the date, and when the Interval pull-down appears, specify the number of rows. Select 5 , 10 , 20 , 50 , or 100 from the Rows pull-down list to limit the display to a the specified number of lines, for easier viewing.
4. Click OK to generate the report.
Report data is sorted and ranked according to how many rows are displayed. By specifying a limited number of rows to be displayed in the graph section of the Report, rankings will apply only to the data in those rows. If you reverse the sort order by clicking on the column bar, only the displayed items will be re-sorted.
To re-sort according to all collected data in the database, click on the Enable Server Side Sort checkbox on the pull-down menu. The ranking of the grid items will then reflect all data from the total entries.
By default, Client-side Sort is used, which sorts only the currently viewable data, which was retrieved the first time the data base was clicked on.
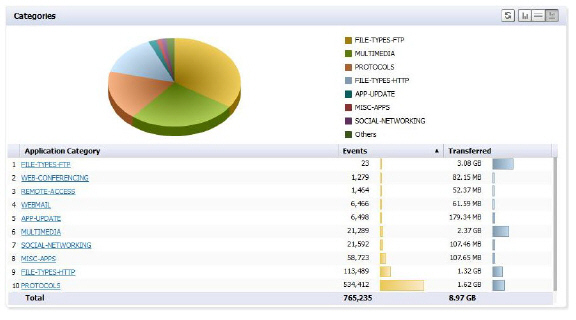
For example, the snapshot below shows data displayed only as it pertains to ten rows.

If you re-rank the column to see the lowest number of hits, it will rank only the items displayed in the ten rows you selected.
Use Enable Server Side Sort to sort data based on all underlying data records, not the client-side sort. Server side Sort retrieves current data from the back end database. Client-side sort merely rearranges the data already retrieved. You can still constrain your display to 10 rows, but the display will re-sort based on the total data collected in the back-end database, and not just the data previously displayed.

The Export Results icons allow you to save a report in either PDF or Excel format.

These buttons provide the following export options:
• Export to PDF : This button will allow you to save the displayed report data to a PDF file. The PDF can export a maximum of 2500 rows.
• Export to CSV : This button allows you to send the report to a file in Microsoft Excel Comma Separated Value (CSV) format. Excel can export a maximum of 10,000 rows.
To print a report, export it to PDF, using the Export to PDF button, then print out the PDF file.
If a very large Report file, such as a system log, is being exported, the number of lines that can be saved is limited. When you click the icon, you will see a message like the following:
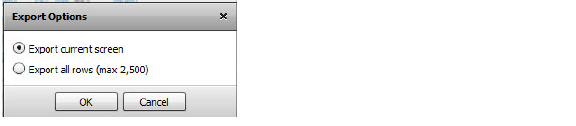
Select whether to print only the currently-displayed screen, or the maximum number of rows.
The Filter Bar provides filtering functions to narrow search results, to view subsets of report data.

The Filter Bar is at the top of the Report. It contains the Add Filter (+) button for adding filters and Go button to apply filters, as well as the Clear Filter button to clear all filters.
Using the Filter Bar allows you to view subsets of the report data, based on a set of pre-defined filters.
Filters can be added in two ways, either explicitly through the Filter Bar, or implicitly by clicking on the hyperlinks in the grid sections of a displayed report. As hyperlinks are clicked, those link criteria are added to the Filter bar as if it was added explicitly. Refer to Adding Filters Implicitly for more information.
Use the Filter Bar to add pre-defined filters from a pull-down menu and to specify parameters for those filters. Filter values will be matched in the database during report generation.
Click the Add Filter button (+) on the left to display a pull-down menu, which can then be used to fine-tune the report data by selecting categories.
Filters can also be added by right-clicking on a column entry and selecting the Filter option from the pull-down menu.
Filter criteria are context-dependant, meaning that Dell SonicWALL Analyzer finds the specific filter operators applicable to the entry. Many filter operators are used in connection with a text string or numeric filter input value that determines what data to include in the report. This control uses auto-complete to suggest a set of candidate values, or you can manually enter a different value. Manually-entered values should be checked for blanks, illegal characters etc.
Operators are specified by clicking on the default operator to bring up the pull-down menu of available operators.

Depending on the selected field type, text string or numeric, several filter operators are available. The filter operators are used with a filter input value to restrict the information displayed in the Detail report.
The operators are defined as shown in Table 4 .
Table 4 Filter Operators
Only data that exactly matches the filter input numerical value will be included in the report
Data values that are not equal to the input numerical value will be included in the report
Data values that are greater than the input value will be included in the report.
Data values that are greater than or equal to the input value will be included in the report.
Data values that are less than the input value will be included in the report.
Data values that are less than or equal to the input value will be included in the report.
Data values that are in the input value will be included in the report.
Data values that are not in the input value will be included in the report.
Data values that are like the input value will be included in the report.
Data values that are not like the input value will be included in the report.
Data values that are between the input values will be included in the report.
Subnet data that is in the specified range will be included in the report.
NOT IN RANGE
Subnet data that is not in the specified range will be included in the report.
You can also use wild-cards (*) in filters to match anything. For instance, you might want to match a User name. You would select LIKE as the operator, and use * in connection with a string. For example, “joh* would match all users starting with “joh,” such as John, Johnny, Johan, etc.
Using the Filter Bar
Use the Filter Bar to manually (explicitly) add filters.
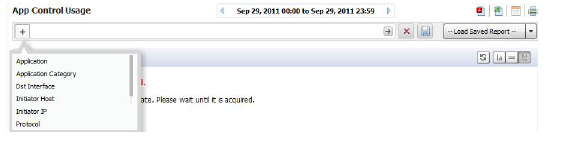
1. To add a filter, click on the Add Filter (+) menu and select a filter from the pull-down menu. Available Filter categories may differ, depending on the report, and may require parameters.
Some filter fields use operators with text or numeric values. Others might have pre-filled values. For example, the Initiator Country filter displays a pull-down list, allowing you to display results based on a selected country.
2. Click the Go button (right-hand arrow) to add a filter Each filter must be applied by clicking on Go before you can select and apply the next filter. The filter bar will show all filters added, whether added from the menu bar or pull-down menu.
As filters are added, items that have been filtered out disappear from the listings, reappearing only when the associated filter, or all filters, are removed.
3. To remove a filter, click the + next to the filter in the menu bar and click the Go (right arrow) button. To clear all filters, click the Clear Filter (x) next to the filter fields.
Adding Filters Implicitly
Dell SonicWALL Analyzer also allows adding filters directly to a drillable (hypertext-linked) column to create a “criteria control,” where you can set a value for the filter. Adding a filter to a column allows you to restrict the display to view only the data related to the entry of interest.
In second-level reports with multiple subsections, filters can be added simply by clicking on the hyperlinked data in the report section.
1. To add a filter to a “drillable” column containing hypertext links, right-click on a hypertext column cell and select Add Filter from the resulting pull-down context menu.
Because the filter is context-sensitive, it may suggest a set of candidate values, or you can manually enter a different value. A new filter will be automatically added to the filter bar, and the report will be updated accordingly.
Once added, the filter is added to the filter area of the Search Bar and no longer appears in the pull-down list. The report will display only results restricted by that filter.
2. To remove the filter, click the x next to that filter, or clear all filters by clicking the red X button to the right of the field.
Saving/Viewing a Filtered Report
The Save Report pop-up menu allows you to save the currently-displayed report with a specified name of no more than 20 characters. You can also overwrite an already-saved report with the current report or overwrite the report to show a new date range.
Saved reports, even if created for a specific unit, are available for all units of that appliance type. For example, if a report for the X1 interface was created for a specific unit, this report is available from any unit: there is no need to create a X1 report for different units.
Note Custom Reports created by a specific user are viewable by that user, and no one else. Domain Administrators can view all available reports.
1. To save a report, along with its filter criteria, click the Save Report icon.
2. Assign it a file name for later reference.
3. To view a saved Custom Report, click the Custom Reports button to bring up a menu that contains a list of all saved Custom reports available for viewing. Selecting a Custom Report from this pull-down loads data for the selected report into the Report Data Container.
4. You can also load a saved report from the Report tab on the middle bar menu. Click Custom Reports on the Reports tab and select the desired report to load it into the Data Container.
5. Click on the appropriate Export Results icon to save a report to a PDF file or Excel spreadsheet. To print a copy of the report, click on the PDF icon and save it to a file, then print the PDF file.
Tip Saved Reports can be modified or deleted by clicking on Custom > Manage Reports .
You can schedule a report to be created and sent to you in email, using the Universal Scheduled Reports function.
The Schedule Reports icon is located to the right side of the toolbar above the Load Custom Reports button.

Click this icon to bring up the Universal Scheduled Report Configuration Manager.
When the Configuration Manager menu comes up, it will be pre-filled with the information about the current Reports page. Using this report, you can set up specific tasks, chose the format for the report, and other options. For more information on using Universal Scheduled Reports, refer to the section: Universal Scheduled Reports.
Report Data Container
The Report Data Container is the screen space where the report data is displayed.
Dell SonicWALL Analyzer provides interactive reporting to create a clear and visually pleasing display of information in the Report Data Container. The Root-level baseline report shows the Chart View, usually containing a timeline or a pie chart and a Graph View.
You can control the way the information is displayed by adjusting the settings through toggles or by configuring reports in the dashboard interface.
Reports have a Date Selector and Filter Bar at the top, with the Report Data Container below it.
Detail-level reports are available either by “drilling down” on hyperlinks in the Root-level view, or, for some types of Reports, as a shortcut on the Report tab.
Note Cell data in the report container can be copied by right-clicking the cell and selecting Copy Cell Data from the pull-down menu.
Layout of the Data Container
The Report Data Container is comprised of a number of Sections. Sections are usually arranged vertically stacked on top of each other. Each section has a “Title Bar” which contains the “Section” title on the left and a group of buttons on the right.The Report itself may contain one or more Sections of data, which are different facets of the report data.

Note Root level reports available in the Reports panel usually contain only one section.
The Report Data Container sections either appear as a chart view, a grid view, or both.
The default display mode is Show Chart and Grid . In this mode, the data is available for viewing as both a ‘Chart’ and a ‘Grid’ . This layout can be controlled by switching between 3 display mode options, any of which can be turned on/off at any time, using the utility toggle button group on the Section Title Bar.
The display modes available on this layout are:
• Show Chart : In this mode only the chart is visible and takes up all the available space inside the section container. Charts show a timeline or pie chart.
• Show Grid : In this mode only the Grid is visible.The Grid Display may contain more than one Section,
• Show Chart and Grid : In this mode both the chart and the grid are visible and are vertically stacked.
Switching between these modes is handled through the utility toggle buttons.

Only one mode can be active at a time.

A ‘Reload Data’ button is present on the title bar in all the layouts described above. Clicking this button will instruct the application to refresh the section data.
You can determine if you have reached the final section in a multi-section Grid View by checking if there is a message about the relevant time-zone at the bottom left of the report. If this message is present, there are no more Grid sections available.
Viewing Syslog Data of Generated Reports
Different types of section data are available under the root-level report. The section level reports are available through the Details entry on the middle pane Reports tab, for some Reports. You can also drill down from the root level report to the second level Detail views, containing multiple subsections, by right-clicking a hyperlink and selecting “Drilldown” from the pull-down menu. The syslog fields corresponding to the applied filter will come up.
Sections in the Grid display may contain drillable columns, containing hypertext links to bring up a Detail Report. A ‘drillable’ column appears as a column in the data grid, where the child values appear underlined and in blue, and act as a hyperlink to additional information. Click on any of these values to drill down to another report, using the value on which drill-down has been executed as a filter. When you click on a drillable link, this filter will be added to the Filter Bar.
Drilling down navigates to a new Detail report, filtered by the data on which the drill-down was executed. Drillable reports can display multiple grid sections in the sub-reports, or bring up a System Analyzer view, depending on the item selected.
The following example illustrates how you can drill down through the Data Usage Report by clicking on a drillable entry to gain more information and filter the results.
1. Click on an appliance, then click Data Usage on the Reports tab. You will see a timeline showing connections.
2. Click on a hyperlinked Time to go to the Detail view of the Report. The Detail view contains multiple sections, including Initiators, Responders, Service types, Initiator Countries, and Responder Countries. Depending on the number of entries, you may need to scroll down to see all the sections.
Note You can also apply a filter through the Filter Bar or by right-clicking the entry. Select the filter and click Go . The Report will show the detail view applicable to that filter.
3. To further filter the output, to view only tcp/https usage, click on the tcp/https entry under Services . A Detail report, filtered to show only usage of tcp/https, comes up. Notice that a Service entry has been added to the Filter Bar.
Notice that the Report now focuses on the filter constraint from the drilled-down column.
Since this report also contains drill-down areas, you can drill down even further to add additional constraints to the results.
Note Many report categories contain a Details item in the list of reports. This link provides a shortcut directly to the Detail view of all sub-sections of the report. You can apply filters directly to the Detail view to further constrain the displayed information.
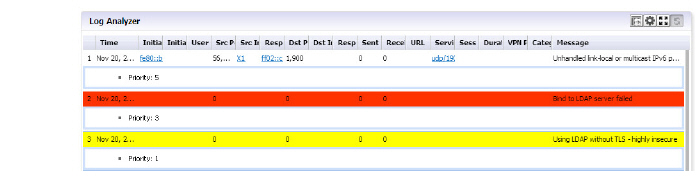
The Log Analyzer provides the most detailed Report information.
4. To view the Log Analyzer, go to the Reports tab once you have drilled down to the desired level of detail and click on Analyzers > Log Analyzer .
Note Because Log Analyzer Reports can contain a very large amount of data, you may wish to limit the amount of data displayed on the page. The amount of data in the report can also affect the loading speed.
The Log Analyzer contains information about each connection, including port and interface information, number of Bytes sent, etc.
You can drill down through the Log Analyzer Report as well. Clicking on a column item adds an additional filter and narrows down your results, allowing you to zoom in on specific instances.
Some Log Analyzer reports can be reached as the final step of a drilldown process.
Click on a row to expand the log, additional information can be viewed here:
The bottom bar of the Log Analyzer contains a page bar, which allows you to navigate through the report by paging forward and backward, or going to the specific page of interest.